Difference between revisions of "Laser Cutter"
From
(→Maintenance) |
|||
| (40 intermediate revisions by 4 users not shown) | |||
| Line 3: | Line 3: | ||
Don't use the following materials : | Don't use the following materials : | ||
| − | |||
* PVC plastic of other material containing chlorine, | * PVC plastic of other material containing chlorine, | ||
* Teflon or other materials containing fluorine, | * Teflon or other materials containing fluorine, | ||
| − | * Rubber, | + | * Natural Rubber, silicon rubber is ok |
* Not recommended Polycarbonate (also known as Lexan, it produces a ugly edge and smokes like crazy). | * Not recommended Polycarbonate (also known as Lexan, it produces a ugly edge and smokes like crazy). | ||
If you are not sure you can use this diagram to [http://hackaday.com/2015/03/14/how-to-identify-plastics-before-laser-cutting-them/ identify the material] | If you are not sure you can use this diagram to [http://hackaday.com/2015/03/14/how-to-identify-plastics-before-laser-cutting-them/ identify the material] | ||
| − | <b>ALWAYS</b> keep an eye on your job when the laser is working. Don't leave it unattended. | + | <b>ALWAYS</b> keep an eye on your job when the laser is working. Don't leave it unattended, it could catch fire. |
| − | + | If you want to buy your own material you could check out the following shops : | |
| + | * [http://kunststofplatenshop.nl kunststofplatenshop] | ||
| + | * [https://www.xxlstunt.nl/assortiment/Kunststof-Platen/Acrylaat-_-Plexiglas-platen xxlstunt] | ||
| + | * [http://www.pyrasied.nl/ pyrasied] | ||
| − | == | + | ==Preparation== |
| − | + | * We use mainly Inkscape, download this [https://inkscape.org/en/release/ here] | |
| − | + | * For instructions for [https://hci.rwth-aachen.de/visicut_and_illustrator Illustrator] (use the template from tkkrlab) | |
| + | * Download [http://visicut.org Visicut], in version 1.7.9-51 or later you can download under menu 'Options --> Download recommended settings : Select "Netherlands, Enschede: TkkrLab"'. This wil also be asked the first time you start VisiCut. | ||
| + | * For older versions of visicut, download setting for [https://github.com/TkkrLab/visicut-settings/archive/master.zip TkkrLab] | ||
| + | * Start visicut and use menu 'Extra --> Install Inkscape Extension' to install the plugin in Inkscape. This only have to be done once. | ||
| − | + | All needed templates and setting can also be found in [[Media:Workshop_Lasercutter_TkkrLab.zip|this download]] | |
| − | + | ||
| − | == | + | =Steps= |
| − | + | ||
| − | + | ==Turn on the laser== | |
| + | Switch on the laser, the airflow and water cooling should start automagicly | ||
| − | + | [[File:TkkrLab_Lasercutter_turn_on.JPG|250px]] | |
| − | + | ||
| − | + | ||
| − | + | ||
| − | + | ||
| − | + | ||
| − | + | ||
| − | + | ||
| − | + | ||
| − | + | ||
| − | + | ||
| − | + | ||
| − | + | ||
| − | + | ||
| − | + | ||
| − | + | ||
| − | + | ||
| − | + | ||
| − | + | ||
| − | + | ||
| − | + | ||
| − | + | ||
| − | + | ||
| − | + | ||
| − | + | ||
| − | + | ||
| − | + | ||
| − | + | ||
| − | + | ||
| − | + | ||
| − | + | ||
| − | + | ||
| − | + | ||
| − | + | ||
| − | + | ||
| − | + | ||
| − | + | ||
| − | + | ||
| − | | | + | |
| − | + | ==Put in the material== | |
| − | + | The table have to be on the right height so that the laser is focused. Use the turning knob to adjust the table hight. | |
| − | + | ||
| − | + | ||
| − | + | ||
| − | + | ||
| − | + | ||
| − | + | ||
| − | + | ||
| − | + | ||
| − | + | ||
| − | + | ||
| − | + | ||
| − | + | ||
| − | + | [[File:TkkrLab_Lasercutter_adjust.JPG|250px]] | |
| − | + | On the table inside right side there is a red line, the top of the material should align to this red line. | |
| − | + | ||
| − | + | ||
| − | + | [[File:TkkrLab_Lasercutter_adjusted.JPG|250px]] | |
| − | + | The material is now set, use your favorite vector program like Inkscape. | |
| − | + | ||
| − | + | ||
| − | === | + | ==Inkscape== |
| − | + | For more instructions how to use inkscape for lasercutter check out [https://wiki.zb45.nl/index.php?title=Cursus_Inkscape this manual] from makerspace ZB45 | |
| − | + | ||
| − | + | ||
| − | + | In Inkscape make something you want to cut. If you have your design done select what you want to cut and use menu 'Extensions --> Lasercut path --> Open in Visicut' | |
| − | + | ||
| − | + | ||
| − | + | ||
| − | + | ||
| − | + | ||
| − | + | ||
| − | + | ||
| − | + | ||
| − | + | ||
| − | + | ||
| − | + | Usefull external links : | |
| − | * | + | ===Inkscape Extensions=== |
| + | * [https://github.com/paulh-rnd/TabbedBoxMaker Boxmaker] to make a nice box. | ||
| + | * [https://github.com/evil-mad/EggBot/releases/latest Eggbot] for hatch fill. | ||
| + | * [https://www.instructables.com/id/The-Ultimate-Guide-to-Laser-cut-Box-Generators/ Instructables] list of Inkscape extentions. | ||
| + | |||
| + | ===Box makers=== | ||
| + | * [http://boxmaker.connectionlab.org/ Simple online boxmaker] | ||
| + | * [http://www.makercase.com/ Also with t-slots] | ||
| + | * [http://www.templatemaker.nl/ Cardboard boxes] | ||
| + | * [https://cdn.rawgit.com/Draradech/35d36347312ca6d0887aa7d55f366e30/raw/b04cf9cd63a59571910cb226226ce2b3ed46af46/jigsaw.html puzzle maker] | ||
| + | |||
| + | ===Fonts=== | ||
| + | If you use a font commercial check the licence! | ||
| + | * [http://www.fontspace.com/category/engraving Free Engraving Fonts] | ||
| + | * [http://www.onelinefonts.com/ One Line Fonts] | ||
| + | * [https://fonts.google.com/ Google Fonts] (all open source) | ||
| + | |||
| + | ==Visicut== | ||
| + | For instructions of visicut check [https://wiki.fablab.berlin/Laser_Cutting_Introduction_(Epilog) FabLab Berlijn] | ||
| + | |||
| + | Select the right material and use the material tab. Depending on what you want to cut or engrave you can review your settings in tab "Laser settings". | ||
| + | |||
| + | For the power / speed setting see the presets as a starting point, you can always adjust these according your own preference. | ||
| + | |||
| + | Use <b>EXECUTE</b> to start the laser cutter job. | ||
==Specifications== | ==Specifications== | ||
| + | * New brains [[MKS_SBASE_Smoothie|Smoothie board]] | ||
| + | * Software compatible : Visicut, Inkscape | ||
| + | * Port : IP | ||
| + | |||
*Item Code: CW3040 | *Item Code: CW3040 | ||
*Working Table Size: 300 *400mm | *Working Table Size: 300 *400mm | ||
*Laser Tube : CO2 glass Tube | *Laser Tube : CO2 glass Tube | ||
| − | *Laser Power : | + | *Laser Power : 60W |
*Cutting Speed : 0-2000 mm/min | *Cutting Speed : 0-2000 mm/min | ||
*Engraving Speed : 0-3000mm/min | *Engraving Speed : 0-3000mm/min | ||
*Resolution : ±0.05mm /1000DPI | *Resolution : ±0.05mm /1000DPI | ||
| − | |||
| − | |||
| − | |||
*Motor : Stepper | *Motor : Stepper | ||
*Power Voltage : AC 110-220V±10%,50-60Hz | *Power Voltage : AC 110-220V±10%,50-60Hz | ||
*Working Environment : 0-45? 5-95% (humidity) | *Working Environment : 0-45? 5-95% (humidity) | ||
*Power consumption : 300W (Total) | *Power consumption : 300W (Total) | ||
| − | + | *Table type : Aluminum (Optional upon needs) | |
| − | *Table type : | + | |
| − | + | ||
*Coolingmode : Water-cooled system | *Coolingmode : Water-cooled system | ||
*Cutting thickness : 3-4mm (upon materials type) | *Cutting thickness : 3-4mm (upon materials type) | ||
| Line 139: | Line 100: | ||
===Controller board=== | ===Controller board=== | ||
| + | No longer in use we replaced this with a [[MKS_SBASE_Smoothie|Smoothie]] clone board. The original was: | ||
* Lihuiyu Studio [[Media:6C6879-LASER-M2-6 Chinese.pdf|6C6879-LASER-M2:6]] board from http://www.3wcad.com/ | * Lihuiyu Studio [[Media:6C6879-LASER-M2-6 Chinese.pdf|6C6879-LASER-M2:6]] board from http://www.3wcad.com/ | ||
* Firmware : 2015.02.15 | * Firmware : 2015.02.15 | ||
| − | |||
| − | |||
| − | |||
| − | |||
=External Links= | =External Links= | ||
| Line 152: | Line 110: | ||
* [http://www.cnczone.com/forums/general-laser-engraving-cutting-machine-discussion/242742-software.html cnc zone] | * [http://www.cnczone.com/forums/general-laser-engraving-cutting-machine-discussion/242742-software.html cnc zone] | ||
* [http://www.lasercrafts.com.au/opencart/index.php?route=information/information&information_id=10 About materials] | * [http://www.lasercrafts.com.au/opencart/index.php?route=information/information&information_id=10 About materials] | ||
| − | + | * [https://mcuoneclipse.com/2017/08/13/getting-control-over-a-50-watt-co2-laser-cutter-from-china/ Getting Control over a 50 Watt CO2 Laser Cutter from China] | |
| − | * [ | + | |
| − | + | ||
| − | + | ||
| − | + | ||
| − | = | + | ==Inkscape boxmaker settings== |
| − | + | {| | |
| − | + | |Kerf | |
| − | + | |0.600 mm | |
| − | + | |- | |
| + | |Clearance | ||
| + | |0.450 mm | ||
| + | |- | ||
| + | |} | ||
=Maintenance= | =Maintenance= | ||
| − | |||
| − | |||
| − | |||
| − | |||
| − | |||
| − | |||
| − | |||
| − | |||
| − | |||
| − | |||
| − | |||
| − | |||
| − | |||
| − | |||
| − | |||
| − | |||
| − | |||
| − | |||
| − | |||
| − | |||
| − | |||
| − | |||
| − | |||
| − | |||
focusing: | focusing: | ||
| Line 203: | Line 137: | ||
===Replacement parts=== | ===Replacement parts=== | ||
| − | * Laser tube around € | + | * Laser tube around € 250 (should last between 4000 hours (if you use always full power) - 10000 hours (if you only use engraving). |
* Replacement Air filter : cost € 85 for active carbon, € 200 for the rest (285 of the whole filter)). Expected life 2 years | * Replacement Air filter : cost € 85 for active carbon, € 200 for the rest (285 of the whole filter)). Expected life 2 years | ||
* Mirror € 80,= | * Mirror € 80,= | ||
* Lens 38 mm € 250,= | * Lens 38 mm € 250,= | ||
Latest revision as of 16:15, 28 August 2018
Contents
Usage
Don't use the following materials :
- PVC plastic of other material containing chlorine,
- Teflon or other materials containing fluorine,
- Natural Rubber, silicon rubber is ok
- Not recommended Polycarbonate (also known as Lexan, it produces a ugly edge and smokes like crazy).
If you are not sure you can use this diagram to identify the material
ALWAYS keep an eye on your job when the laser is working. Don't leave it unattended, it could catch fire.
If you want to buy your own material you could check out the following shops :
Preparation
- We use mainly Inkscape, download this here
- For instructions for Illustrator (use the template from tkkrlab)
- Download Visicut, in version 1.7.9-51 or later you can download under menu 'Options --> Download recommended settings : Select "Netherlands, Enschede: TkkrLab"'. This wil also be asked the first time you start VisiCut.
- For older versions of visicut, download setting for TkkrLab
- Start visicut and use menu 'Extra --> Install Inkscape Extension' to install the plugin in Inkscape. This only have to be done once.
All needed templates and setting can also be found in this download
Steps
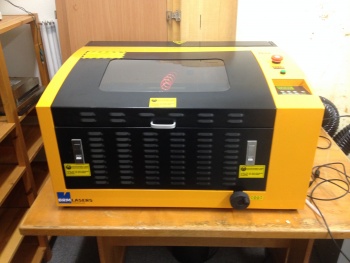
Turn on the laser
Switch on the laser, the airflow and water cooling should start automagicly
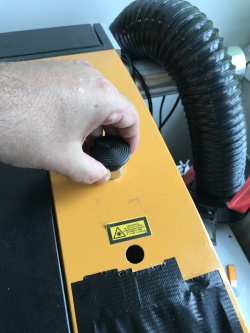
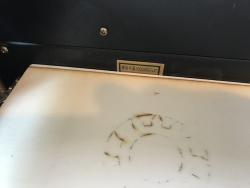
Put in the material
The table have to be on the right height so that the laser is focused. Use the turning knob to adjust the table hight.

On the table inside right side there is a red line, the top of the material should align to this red line.
The material is now set, use your favorite vector program like Inkscape.
Inkscape
For more instructions how to use inkscape for lasercutter check out this manual from makerspace ZB45
In Inkscape make something you want to cut. If you have your design done select what you want to cut and use menu 'Extensions --> Lasercut path --> Open in Visicut'
Usefull external links :
Inkscape Extensions
- Boxmaker to make a nice box.
- Eggbot for hatch fill.
- Instructables list of Inkscape extentions.
Box makers
Fonts
If you use a font commercial check the licence!
- Free Engraving Fonts
- One Line Fonts
- Google Fonts (all open source)
Visicut
For instructions of visicut check FabLab Berlijn
Select the right material and use the material tab. Depending on what you want to cut or engrave you can review your settings in tab "Laser settings".
For the power / speed setting see the presets as a starting point, you can always adjust these according your own preference.
Use EXECUTE to start the laser cutter job.
Specifications
- New brains Smoothie board
- Software compatible : Visicut, Inkscape
- Port : IP
- Item Code: CW3040
- Working Table Size: 300 *400mm
- Laser Tube : CO2 glass Tube
- Laser Power : 60W
- Cutting Speed : 0-2000 mm/min
- Engraving Speed : 0-3000mm/min
- Resolution : ±0.05mm /1000DPI
- Motor : Stepper
- Power Voltage : AC 110-220V±10%,50-60Hz
- Working Environment : 0-45? 5-95% (humidity)
- Power consumption : 300W (Total)
- Table type : Aluminum (Optional upon needs)
- Coolingmode : Water-cooled system
- Cutting thickness : 3-4mm (upon materials type)
- Rotary device : optional
- Packing Size : 123*79*60cm
- Gross Weight : 77/kg
Controller board
No longer in use we replaced this with a Smoothie clone board. The original was:
- Lihuiyu Studio 6C6879-LASER-M2:6 board from http://www.3wcad.com/
- Firmware : 2015.02.15
External Links
If you want to improve the laser check the following links
- fabriekant?
- tips tokyo hackerspace
- cnc zone
- About materials
- Getting Control over a 50 Watt CO2 Laser Cutter from China
Inkscape boxmaker settings
| Kerf | 0.600 mm |
| Clearance | 0.450 mm |
Maintenance
focusing: link
how to maintain a laser cutter: maintenance
Water Cooling
If you need to replace the water in the water cooling replace it with Demi water with 10% antivries (in case the room can get < 0c).
Air Filter
- Transport keep it upright (or let it rest 96 hours).
Replacement parts
- Laser tube around € 250 (should last between 4000 hours (if you use always full power) - 10000 hours (if you only use engraving).
- Replacement Air filter : cost € 85 for active carbon, € 200 for the rest (285 of the whole filter)). Expected life 2 years
- Mirror € 80,=
- Lens 38 mm € 250,=
