Difference between revisions of "TS6090 TwenSpace laser cutter"
From
| (17 intermediate revisions by the same user not shown) | |||
| Line 4: | Line 4: | ||
|Skillz=Electronics, firmwere | |Skillz=Electronics, firmwere | ||
}} | }} | ||
| − | I bought a TS6090 80W laser cutter made | + | =This page is no longer maintained, go to site of [http://daveborghuis.nl/wp/ts6090-laser-cutter/ daveborghuis.nl] to see the latest updates.= |
| + | |||
| + | I bought a TS6090 80W laser cutter made with brandname "JIN ZHI YIN". As you would expect with a cheap china laser cutter the controlling hardware (and software) is a bit crappy. I make the changes as mentioned here so I can use this lasercutter for my own [https://twenspace.nl/wp/apparatuur/lasercutter/ makerspace] | ||
= TS6090 = | = TS6090 = | ||
| Line 15: | Line 17: | ||
[[File:Lihuiyu_m2-nano.jpg|250px|Controller board of TS6090, Lihuiyu M2 Nano]] | [[File:Lihuiyu_m2-nano.jpg|250px|Controller board of TS6090, Lihuiyu M2 Nano]] | ||
| − | So I want to upgrade the 'brains' of the machine with a MKS board (clone of [http://smoothieware.org/smoothieboard smoothieboard]). TkkrLab have already modified another lasercutter that works well with all the modifications, so I want to change this laser to the same software. | + | So I want to upgrade the 'brains' of the machine with a MKS board (clone of [http://smoothieware.org/smoothieboard smoothieboard]). TkkrLab have already modified another [[Laser_Cutter|lasercutter]] that works well with all the modifications, so I want to change this laser to the same software. |
=Hardware Modifycations= | =Hardware Modifycations= | ||
| Line 23: | Line 25: | ||
* [https://www.aliexpress.com/item/128-64-DOTS-LCD-module-5V-blue-screen-12864-LCD-with-backlight-ST7920-Parallel-port-LCD12864/32716038745.html LCD screen] ($4.80) The package deals with touch screens doesn't work in these configs. | * [https://www.aliexpress.com/item/128-64-DOTS-LCD-module-5V-blue-screen-12864-LCD-with-backlight-ST7920-Parallel-port-LCD12864/32716038745.html LCD screen] ($4.80) The package deals with touch screens doesn't work in these configs. | ||
* [https://www.aliexpress.com/item/Rotary-Encoder-code-Switch-EC11-Digital-Potentiometer-with-Switch-5Pin-Handle-Length-20mm/32587006925.html Rotary encoder] ($1.28 ) for menu control. | * [https://www.aliexpress.com/item/Rotary-Encoder-code-Switch-EC11-Digital-Potentiometer-with-Switch-5Pin-Handle-Length-20mm/32587006925.html Rotary encoder] ($1.28 ) for menu control. | ||
| − | ===Small electronic parts== | + | ===Small electronic parts=== |
* For power controller | * For power controller | ||
** 2 Optocouplers $0.50 a piece and | ** 2 Optocouplers $0.50 a piece and | ||
| Line 39: | Line 41: | ||
=Changes= | =Changes= | ||
| − | * XY Stops was 1 connector (white bottom on before photo), changed this to two separate connectors. Use a multimeter to see how the connections are. | + | * XY Stops was 1 connector (white bottom on before photo), changed this to two separate JST 2 pin connectors. Use a multimeter to see how the connections are. |
| − | * Power for the board | + | * Power for the board, we only need 24V. Smoothieboard has screw terminal, just screw on the cables (was 24+5 volt for Lihuiyu board) |
* Smoothie use the same connectors for XY steppers, so just plug in. | * Smoothie use the same connectors for XY steppers, so just plug in. | ||
| + | * Added switch between water sensor to disable laser when door open. The pin is labeled with "WP" (Water Protect). | ||
| + | |||
| + | [[File:TS6090 door switch.JPG|250px|thumb|Added open door switch sensor to the WP pin]] | ||
==Laser control== | ==Laser control== | ||
Power control was done manually with a seperate control (bottom left on before photo, that has to be done from smoothieboard. For this we create a small print inspired on our experience with the [https://tkkrlab.nl/projects/git-tkkrlaser/ TkkrLab lasercutter]. | Power control was done manually with a seperate control (bottom left on before photo, that has to be done from smoothieboard. For this we create a small print inspired on our experience with the [https://tkkrlab.nl/projects/git-tkkrlaser/ TkkrLab lasercutter]. | ||
| − | Remove the original analog display (unscrew bolts) and button interface (you can control it by software, so not REALLY needed). Later you can replace this with a nice LCD display & Rotary Encoder. The connector of this original analog display is connected to smoothieboard J8 (near SD card). | + | Remove the original analog display (unscrew bolts) and button interface (you can control it by software, so not REALLY needed). Later you can replace this with a nice LCD display & Rotary Encoder. The connector of this original analog display is connected to laser controller and smoothieboard J8 (near SD card). |
| − | + | ||
| − | + | ||
| − | + | ||
| − | + | ||
| − | + | ||
| − | + | ||
| − | + | ||
| − | + | ||
| − | + | ||
| − | + | ||
| − | + | ||
| − | + | ||
| − | + | ||
| − | + | ||
| − | + | ||
| − | + | ||
| − | + | ||
| − | + | ||
| − | + | ||
| − | + | ||
| − | + | ||
| − | + | ||
| − | + | ||
| − | + | ||
| − | + | ||
| − | + | ||
| − | + | ||
| − | + | ||
| − | + | ||
| − | + | ||
| − | + | ||
| − | + | ||
| − | + | ||
| − | + | ||
| − | + | ||
| − | + | ||
| − | + | ||
| − | + | ||
| − | + | ||
| − | + | ||
| − | + | ||
| − | + | ||
| − | + | ||
| − | + | ||
| − | + | ||
| − | |||
| − | + | ==Camera== | |
| − | + | I use [https://lightburnsoftware.com Lightburn] for controlling the laser, this has a camera option. | |
| − | + | * 8MP camera with viewing angle of 85°, bought via [http://s.click.aliexpress.com/e/6HCBgNw Aliexpress] and USB extension cord. | |
| − | + | * Camera mount via [https://www.thingiverse.com/thing:3485381 thingiverse]. | |
| − | + | ||
| − | + | ||
| − | + | ||
| − | + | ||
| − | + | ||
| − | + | ||
| − | + | ||
| − | + | ||
| − | + | ||
| − | + | ||
| − | + | ||
| − | + | ||
| − | + | ||
| − | + | ||
| − | + | ||
| − | + | ||
| − | + | ||
| − | + | ||
| − | + | ||
| − | + | ||
| − | + | ||
| − | + | ||
| − | + | ||
| − | + | ||
| − | + | ||
==After== | ==After== | ||
| − | [[File: | + | [[File:TS6090 smoothie board.JPG|250px]] |
=Software= | =Software= | ||
First update the current firmware with the latest. All left to do is to make a good 'config' text file with all the settings. | First update the current firmware with the latest. All left to do is to make a good 'config' text file with all the settings. | ||
| + | Download here my [[:File:TS6090 MKS.zip|config and firmware]] | ||
Latest revision as of 23:49, 10 December 2019
| Project: TS6090 Laser cutter | |
|---|---|
| |
| Name | TS6090 Laser cutter |
| Initiator | Zeno4ever |
| Status | {{{Status}}} |
| Skills | Electronics, firmwere |
| Summary | {{{Summary}}} |
Contents
This page is no longer maintained, go to site of daveborghuis.nl to see the latest updates.
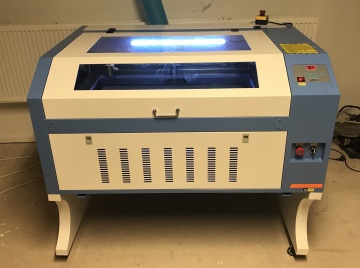
I bought a TS6090 80W laser cutter made with brandname "JIN ZHI YIN". As you would expect with a cheap china laser cutter the controlling hardware (and software) is a bit crappy. I make the changes as mentioned here so I can use this lasercutter for my own makerspace
TS6090
Specifications (in short)
- Bed size 60x90 cm
- 80 Watt laser tube
- Flow sensor (connected to power supply)
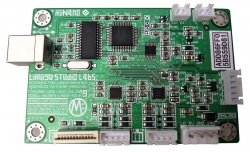
- Lihuiyu M2 Nano controller (with Coreldraw plugin and USB protection)
So I want to upgrade the 'brains' of the machine with a MKS board (clone of smoothieboard). TkkrLab have already modified another lasercutter that works well with all the modifications, so I want to change this laser to the same software.
Hardware Modifycations
Needed parts
Prices are indication of cost, no shipping, tax etc.
- MKS board ($45.59)
- LCD screen ($4.80) The package deals with touch screens doesn't work in these configs.
- Rotary encoder ($1.28 ) for menu control.
Small electronic parts
- For power controller
- 2 Optocouplers $0.50 a piece and
- 2 x 100R
- 2 x 500R
- 6 female pin header for the power controller
- 2 x JST 2 pin for the endstops
Additional general info
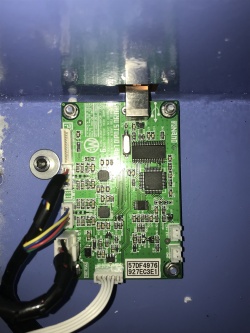
Before
Changes
- XY Stops was 1 connector (white bottom on before photo), changed this to two separate JST 2 pin connectors. Use a multimeter to see how the connections are.
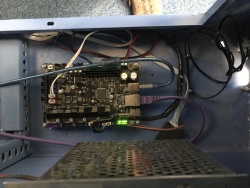
- Power for the board, we only need 24V. Smoothieboard has screw terminal, just screw on the cables (was 24+5 volt for Lihuiyu board)
- Smoothie use the same connectors for XY steppers, so just plug in.
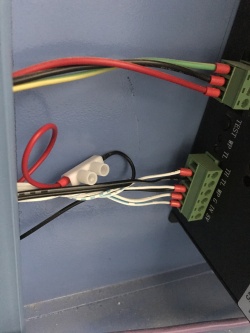
- Added switch between water sensor to disable laser when door open. The pin is labeled with "WP" (Water Protect).
Laser control
Power control was done manually with a seperate control (bottom left on before photo, that has to be done from smoothieboard. For this we create a small print inspired on our experience with the TkkrLab lasercutter.
Remove the original analog display (unscrew bolts) and button interface (you can control it by software, so not REALLY needed). Later you can replace this with a nice LCD display & Rotary Encoder. The connector of this original analog display is connected to laser controller and smoothieboard J8 (near SD card).
Camera
I use Lightburn for controlling the laser, this has a camera option.
- 8MP camera with viewing angle of 85°, bought via Aliexpress and USB extension cord.
- Camera mount via thingiverse.
After
Software
First update the current firmware with the latest. All left to do is to make a good 'config' text file with all the settings. Download here my config and firmware
