Naaimachine
From
Contents
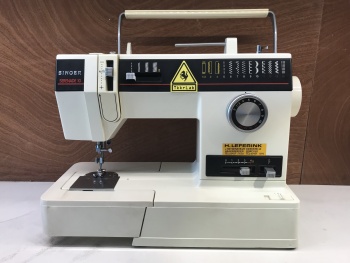
Singer Serenade 10
https://www.youtube.com/watch?v=A_8XXYJNrik
In short
- Sewing machine with useful and decorative stitches.
- Straight stitch
- Zigzag
- Blind seam
- Stretch stitch
- Automatic button hole maker
- CYBER approved
Setting it up
- Pins (kopspelden)
- Seam ripper (tornmesje)
- Scissors
- Fabric
- Thread on a bobbin (draad op een klosje)
- (Nearly) empty spool ((bijna) leeg spoeltje)
Find yourself a nice set of pins, preferably on a pincushion so you can easily grab and toss them later. Check the sewing machine accessories for spools. If there is a spool with very little yarn on it, claim it for use later. If all spools are full, take one with you to buy some extra. You can never have enough spools.
Now, get your fabric to define what yarn you need. If it is bright white, or black, you can go with similarly coloured yarn; you can get that at the supermarket. If not, you will want to buy matching yarn. You can do this at a haberdashery shop (fourniturenwinkel), or the market (Enschede: Tuesdays and Saturdays). Bring the fabric to get a perfect match. If you need to, buy new spools, too. They're sold without yarn. Some supermarkets sell spools, but don't count on it. Try the mentioned shops, or Bertus Workel.
Be picky in choosing yarn! Yarn sets with a variety of colours are sold everywhere, but the yarn is often raw, knotty, and will make easy sewing a horror. Every other stitch it will knot itself and you have to start over. Husqvarna yarn, and whatever the owner of a shop or market stall advises you, is usually okay in quality.
Winding a spool
The bobbin will provide you the yarn for the spool. You'll now learn how to transfer it on. First, you place the bobbin with the yarn on the sewing machine. Secure the bobbin with matching plastic cap you'll find in the accessories. Next, wrap loose end of the bobbin thread onto the spool. Lead the thread from the bobbin, over the chrome guiding head on the left-top of the machine, to the empty head on the top-right. Place the spool on the head you see on the top-right of the sewing machine. Push the spool firmly to the chrome hook, or it won't spin. Now reach for the wheel on the right side of the machine, and push the inside of the wheel to toggle the spool-winding function.
Gently push the foot pedal down to get the spool head spinning. If it doesn't spin, push it against the hook more firmly. If it winds up the wrong way, well... pick it up and place it on upside down. There's no way to indicate how much yarn your spool needs. Basically, it's the same length as you'll use from your bobbin. Make an educated guess, add 20% more for safety, and get going. When you're done, pull it back from the hook, and flip the wheel toggle back.
Rigging your bobbin
That sounds cool alright? Yes? Well it isn't. It's about the most stupid job to do. First, get the loose end of thread from the bobbin. Keep the bobbin in place, though. Cut the end of the thread with sharp scissors. You'll thank me later. The following steps are very specific to this sewing machine, and not brought into practice by yours truly yet, so take this with a grain of salt. Lead the thread end down to the left, around the white knob on the top, but then straight down so it dips down to the U-turn. Wrap it clockwise around the U-turn back up, over the vertical guide, and downward on its left side again. If you're confused now, you'd better look up a video for this. Basically, you make a giant vertical zigzag, hereby securing the upper thread in the tension system. Tension of the upper thread is very important. As you come down, you'll want to leave that loose end of thread somewhere. Here, the fidgety part starts. Turn the right side wheel you used earlier, until the needle is in its highest position. Stab the thread end through the hole in the needle. Come again? Yes, there's a hole in that needle. Keep stabbin' until the thread is through, then pull it gently through, and leave about 15 cm on the table behind the machine.
Rigging your spool
This is also a part that heavily depends on the type of machine you have. Just like washing machines, you have front and top loaders. This Singer is a top loader when it comes to spools. Lay your freshly created spool in the container, and lead the thread around it in the right way*. Look up a Youtube video how this is done with this machine. When you're done, pull up this lower thread, and like the upper thread, pull it back about 15 cm and let it rest there.
Getting all fabricky
You'll probably want to prepare your fabric now. How much preparation you need depends on the type of fabric, and how much of a perfectionist you are. You can usually always do it over, but your fabric will be more or less damaged, and it takes heaps of time.
Thin, fluttery, slippery fabric: prepare well with pins along the line you want to seam.
Thick, sturdy, rough fabric: fold and hold as you go.
Basically, a sewing needle has three dimensions. Up, down, forth, back, left, and right.
Up and down is easy. You control this by pressing your foot down on the pedal. The needle moves up and down, that's it.
Forth and back are easy, too. The sewing machine always sews forth (needle stays in place, fabric moves away from you), unless you tell it to sew backwards, or sew in one place. You can control how much it moves forward with every stitch. This is called the stitch length (steeklengte). Fine fabrics demand tiny stitches (3-5mm), coarse fabrics can handle longer stitches (8-12mm). Don't switch stitch length while sewing. It gets ugly.
Left and right can be set, too. In general, you sew straight on: stitch width (steekbreedte) is set to 0. Once you increase it, the needle will dance from left to right with each forward movement (lovely, heh?). This is useful for stretchy fabrics, that will rip a straight sewn line immediately when you stretch them out. The wider your stitch, the more stretch it can handle. There is even a special stretch stitch, but that's a separate setting.
Sewing
Non-stretch fabric
The next steps will be based on having fairly thick, sturdy fabric that doesn't stretch in the direction you are sewing. Jeans, linen, basic cotton. If you're not sure about the stretching, don't follow these steps.
Say you want to sew a handkerchief. First, you cut your square of fabric on all sides about 1 cm bigger than you want the end result. Good. Lay the fabric under the needle. First, pull up the lever behind the needle. The foot and needle gently move upward. Lay your fabric down, edge of the fabric exactly in line with the middle of the foot, and pull the lever down again. The fabric should be held tight. Don't pull or wiggle.
Set your machine to a stitch length of about 5mm max, and stitch width about the same. Gently start sewing the exact edge of the fabric. We are doing this to secure the edge and prevent rips and loose threads later on (afzigzaggen). Sew every edge. You'll see that the transporter, aka the rocky road under the needle, grabs your fabric at every stitch, and carries it backwards. When you're done, the thing will look more ugly than when you started. That's alright. Cut off the loose thread ends on start and end. You can do this with the little knife edge on the pole behind the needle.
Now, fold every edge of your fabric in, about 1cm on all sides. The 1cm more or less matches the width of the foot. Don't make it so tight you'll have to sew over the zigzag stitch. Secure it with pins. Less is better, but loose is bad. Remember that the ugly side of seams are always on the inside. So think ahead, especially when you get to making more complex items that have to be sewn together after you've seamed them. The seam always needs to end up on the inside.
Choose one corner to start on, place your fabric under the needle as before, with the lever down. Double check if you changed your zigzag stitch to a straight stitch. Stitch width should be set to 0, stitch length can stay the same. Pull out your first pin, and gently sew the folded fabric. Now realise that you're happy to have same coloured lower thread, as upper thread. Because what you're not seeing now, is that your spool thread is providing for the stitch on what's going to be the top side of your handkerchief. So: never choose an ugly spool colour that you've got laying around. It'll stand out like a sore tooth sooner or later.
Once again, sew all four sides of your fabric. Pull out pins and pin them on the pincushion as you go. Pro tip! Stick them in your mouth with care, so you have a decent reason to avoid conversation. Practice on the 'can't talk right now' with at least four pins between your lips. Works!
Stretch fabric
Follow all steps above, only, when coming to the seam, keep the zig zag stitch. Don't change it to a straight stitch. As I said, stretch fabrics can't handle straight stitches like the Hulk can't handle is clothes when he's in rage.
Use the single zigzag (stitch width matches stitch length), sewn zigzag, or the special zigzag stitch. Try some before you start on the real deal.
