Lcd through IOexpander
From
Contents
Goal
The Goal was to save a lot of pins on the arduino,
I had seen that controlling a LCD through a IOexpander was possible,
So I thought I'd take the challenge and see if it would work.
And it did, controlling an lcd with only 2 pins!
Now I am gonna share it with the world :)
And as a plus, When you take the LCD off you've got controlle over 16 IO pins,
To do as you please!
Hardware
The Hardware you need:
- 1x Arduino
- 1x MCP23016(or Similar)
- 1x resistor 3K9 Ohm
- 1x resistor 220 ohm
- 1x pot 5k Ohm
- 1x 33 pF capacitor
- 1x Lcd(In my case 16x2)
Software
Arduino Ide
linux or windows or what ever OS you use that supports the Arduino Ide.
(Some programming skill can come in handy)
Schematic
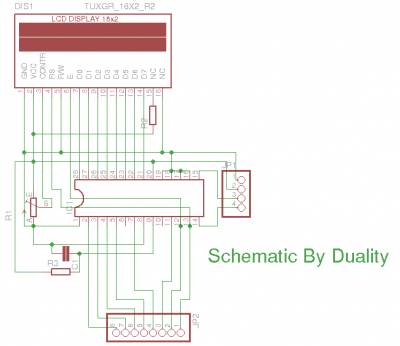
Explanation
- R1 is a potentiometer In my case I used a 5K pot meter.
- R2 is 220 ohm (if you lcd doesn't have back lighting you can just forget R2 and the connections to pin 15 and 16.)
- R3 is 3K9 ohm resistor and has to do with how this I/O expander is wired.
- C1 is 33pF and also has to do with how this I/O expander is wired up.
- JP1 3 and 4 go on analog pins 4 and 5 on arduino, and pin 2 on JP1 is voltage +.
Now, if you decide to use a Diffrent type of I/O expander that is pin compatible with this one, you Should look up the value's of R3 and C1.
Library
here it is:
https://github.com/Duality4Y/IOlcd
notice: contents of folder IOlcd1_0 contains the source that works with arduino 1.0
there is still a lot to do though, keep that in mind.
only 16x2 is supported yet, other size should be easy to add,
just don't have the hardware to test so won't even try to code it :)
at the moment these things are available:
* IOlcd lcd;                             // what this does is allow you to run multiple instance's, meening you can controle more lcd's if you want like IOlcd lcd2;
* print();                               // prints any thing you put between the (), put strings in like this "string" and for variables just the name of the variable.
* home();                                // sets cursor first place first line.
* write(data);                           // writes data to lcd example: write(33); would print ! on the lcd.
* setCursor(int x,int y);                // x is columns and y is rows.
* blinkCursor();                         // sets cursor active, blinking square for now.
* noBlinkCursor();                       // sets cursor inactive, no blinking square visible.
* clear();                               // clears the screen.
* createChar();                          // posted an example on how to use it'll clear things up :) remember only place for 8 custom chars..
* scrollDisplayRight();                  // scrolls the contents of the display 1 square to the right every time the function is called.
* scrollDisplayLeft();                   // does the opposite scrolls the contents of the display 1 to the right every time it's called.
* begin(int x, int y);                   // x is the number of columns the display has, and y the number of rows.
* init(address, chip);                   // initializes the IOexpander chipt, address for it's address, and chip for the chip you use
                                         // mcp23016 mcp23017 mcp23018 are supported but not tested. only mcp23016 is tested, example: init(0x20, MCP23017);
                                         // for now the library only supports 16x2 Liquid Crystal Displays.
Example Sketches
Can be found in the folder of library Here are a few though:
Hello World:
//include the nesecary header files for this to work.

#include <IOlcd.h>
#include <Wire.h>;

IOlcd lcd;
long count = 1;

void setup(){

  lcd.init(0x20, MCP23016);                 //initialize the chip(in this case MCP23016) at address 0x20

  lcd.begin(16,2);                          //start the lcd

  lcd.home();                               //start at the beginning of the first lcd line.

  lcd.print("Hello, World!");               //print hello world to the first line.
}

void loop(){

  lcd.setCursor(0,1);                       //set cursor to the second line.

  lcd.print(count);                         //number of seconds active, is printed.
  count++;
  delay(1000);
}
Serial Display:
/* quick note, more then 16 characters send
the line won't wrap to the line underneath it. */

#include <IOlcd.h>
#include <Wire.h>;

IOlcd lcd;

void setup(){

  lcd.init(0x20, MCP23016);                 //initialize the chip(MCP23016) at address 0x20.

  lcd.begin(16,2);                          //start the lcd

  Serial.begin(9800);                       //start serial connection.
}

void loop(){

  if(Serial.available()){                   // check if characters arrive over the serial port.

    delay(100);                             //wait a bit.

    lcd.clear();                            //clear the screen.

    while(Serial.available() > 0){          //read the data.

      lcd.write(Serial.read());             //write data to the lcd.
    }
  }
}
example on creating custom chars:
#include <IOlcd.h>
#include <Wire.h>

IOlcd lcd;

//here we create an array that contains the actual data that's
//going to display a smiley, you see it even looks like it.
byte smiley[8] = {
  B00000,
  B10001,
  B00000,
  B00000,
  B10001,
  B01110,
  B00000,
};


void setup() {
  //it's important to always first initialize the IO chip.
  lcd.init(0x20, MCP23016);
  //and it's also imporant to create the char before you even
  //start the lcd.
  lcd.createChar(0, smiley);
  //here we start the lcd like normal
  lcd.begin(16, 2);
  //we set cursor "home", and clearing maybe previous rubish on screen
  lcd.home();
  lcd.clear();
  //we write the costum char. first int in createChar is memory addres.
  //when you write that memory address with lcd.write you'l print it on
  // the lcd.
  lcd.write(0);
}

void loop() {}
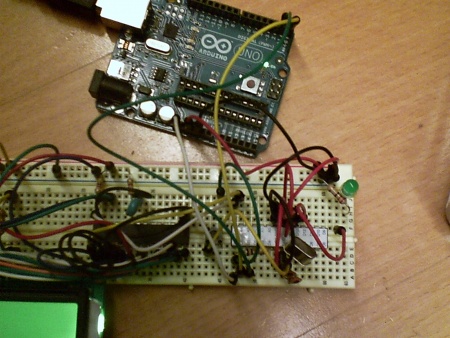
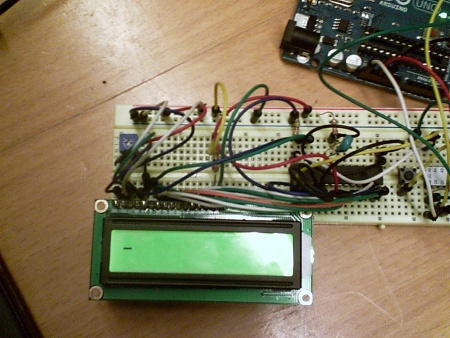
pictures and vids
 .
.