ESP8266 TEMP LOGGER
From
Contents
Objective
- Log temperature on a server over my wireless home network for later analysis
Main Features
- Wifi connection to home network with wpa/wpa2 buitin support
- Temperature logging with 2 decimal
- Push of the information to the server
- Multi unit support at the server level
- cheap DS18B20 used in place of DHT11 which is very poor in accuracy
- The timestamp of each value stored on the server is provided by the server itself because ESP8266 does not have a clock
Credits
This project is a compilation of multiple tutorials found on the net here a some links used for writing the code and making the connections:
- Arduino IDE setup for ESP8266
- many search on google and lot of trials and errors
- wemos D1 mini
- feel free to contact me at jjguazzo@hotmail.com
Personal feedback
This i my first real life working project
I first try to setup my sensor with a really cheap ESP8266 (ESP01) and a DHT11 sensor but i quickly discover that the DHT11 sensor was not reliable due to the error margin of this component and that the cheapest ESP8266 was not stable and made some very strange crashes.
i first try also to use Esplorer tho write the code but with mitigated success.
I tried also using the famous "AT" commands in conjunction with a cheap chinese UNO R3 but was also unsuccesful.
The wemos D1 mini chip is a really well done chip with a builtin CHG 340 interface (UART/serial through usb).
The project take me around 10 hours to be succesfull but mainly spend with unstable hardware and internet search/read.
The code is not as clean as i expected when i start this small project but i prefer to share as soon as possible and tune it when i have more time.
edit 20160428: The project is runing for more than 20 days now and is very stable even when the server is down, the esp8266 run fine ;-) the temperature log is around 2,7 Mb
Prerequisites
- ESP8266 support in arduino IDE (integrated Developpment environnment) http://www.esp8266.nu/index.php/Tutorial_Arduino_Firmware_Upload
- a working CHG340 driver
- Good ESP8266 unit with builtin UART interface (i make this project using Wemos D1 mini - ESP12 based)
- The firmware uploaded on this site (at least because i tested whith this one)
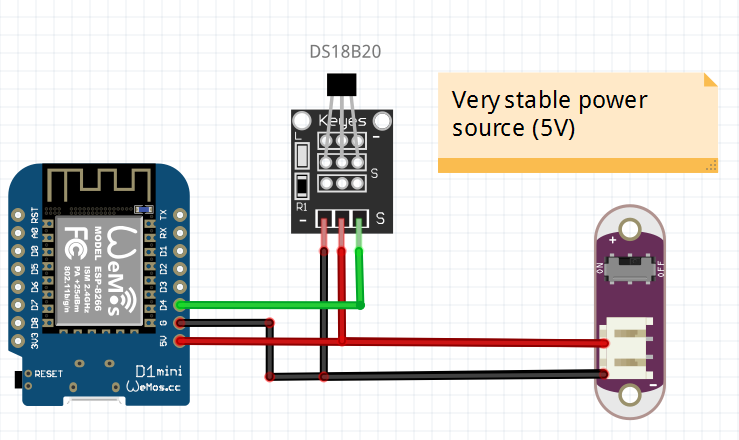
- DS18B20 "ready to use" sensor (integrating resistor)
- A very very stable power source because the ESP8266 seems very sensitive to power changes
- a Php enabled web server (i used XAMPP on my windows 10 desktop)
Fritzing the project
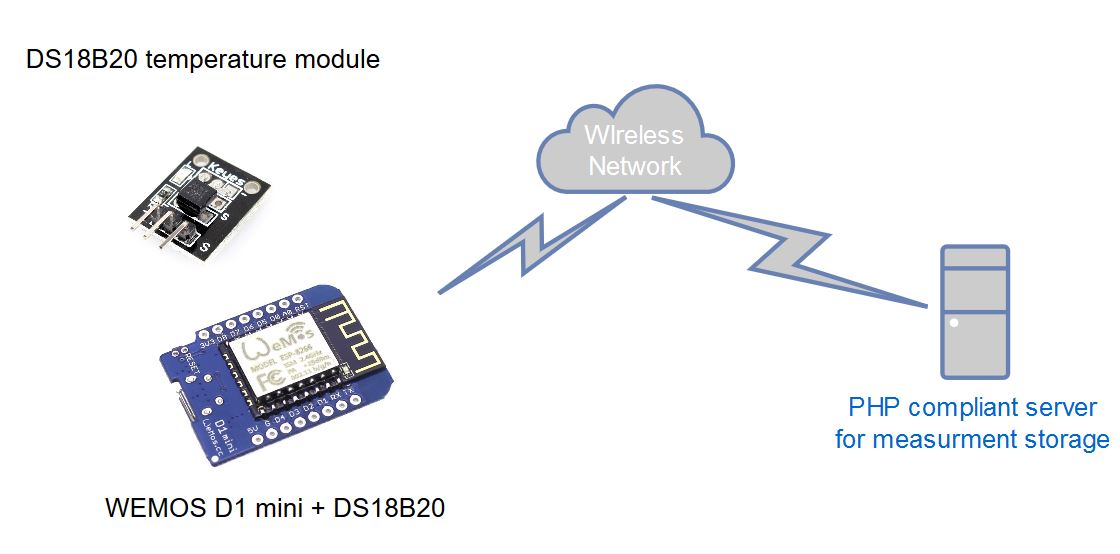
Network design:
front with DS18B20 wiring:
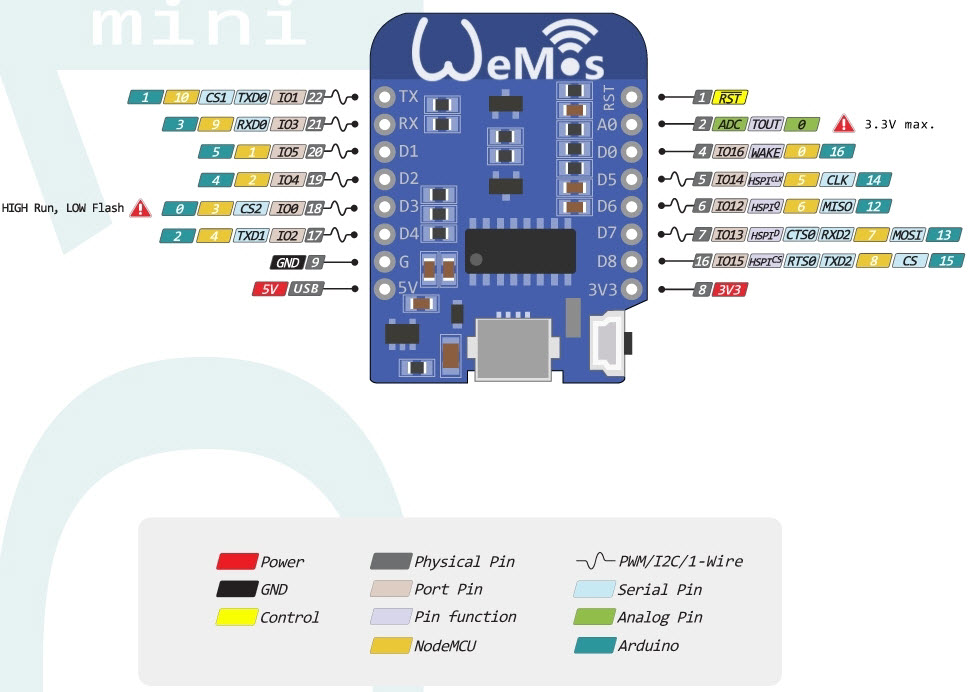
Wemos back pinout:
note: this is not the link to the orginal pictures to avoid unexpected changes regarding the code below
ESP8266 arduino IDE code
working code with following nodemcu firmware 0.9.6 (File:nodemcu_float_0.9.6-dev_20150704.zip)
    // Libraries

      #include <OneWire.h>
      #include <DallasTemperature.h>

      #include <ESP8266WiFi.h>
      #include <ESP8266WiFiMulti.h>
      #include <ESP8266HTTPClient.h>
      // Pin
      #define ONE_WIRE_BUS 2  // DS18B20 pin
      OneWire oneWire(ONE_WIRE_BUS);
      DallasTemperature DS18B20(&oneWire);


      #define USE_SERIAL Serial
      ESP8266WiFiMulti WiFiMulti;

      void setup() {

       Serial.begin(115200);      // Start Serial
       USE_SERIAL.begin(115200);
       // USE_SERIAL.setDebugOutput(true);

        USE_SERIAL.println();
        USE_SERIAL.println();
        USE_SERIAL.println();

        for(uint8_t t = 4; t > 0; t--) {
            USE_SERIAL.printf("[SETUP] WAIT %d...\n", t);
            USE_SERIAL.flush();
            delay(1000);
        }

        WiFiMulti.addAP("YOURSSID", "WPAKEY");

      }
      void loop()
      {

        DS18B20.requestTemperatures();
        String temp;
        temp = String(DS18B20.getTempCByIndex(0));
        Serial.print("Temperature DS18B20: ");
        Serial.println(temp);


        HTTPClient http;

        USE_SERIAL.print("[HTTP] begin...\n");
        // configure traged server and url
        http.begin("http://192.168.1.10/test.php?ipsrc=1&temperature="+ temp + "&humidity=1&voltage=1"); //HTTP

        USE_SERIAL.print("[HTTP] GET...\n");
        // start connection and send HTTP header
        int httpCode = http.GET();

          // httpCode will be negative on error
          if(httpCode > 0) {
              // HTTP header has been send and Server response header has been handled
              USE_SERIAL.printf("[HTTP] GET... code: %d\n", httpCode);

              // file found at server
              if(httpCode == HTTP_CODE_OK) {
                  String payload = http.getString();
                  USE_SERIAL.println(payload);
              }
          } else {
              USE_SERIAL.printf("[HTTP] GET... failed, error: %s\n", http.errorToString(httpCode).c_str());
          }

          http.end();
          delay(10000);

      }
Php Code
save on the root of your php server with filename "test.php"
<?php
if(!empty($_GET["temperature"]) && !empty($_GET["humidity"]) && !empty($_GET["voltage"]) && !empty($_GET["ipsrc"])){
   $csvData = array($_GET["ipsrc"],$_GET["temperature"],$_GET["humidity"],$_GET["voltage"],date("Ymd"),date("H:i:s"));
   $fp = fopen("order.csv","a");
   if($fp)    {
       fputcsv($fp,$csvData); // Write information to the file
       fclose($fp); // Close the file
   }
}
?>
