ARDUINO-RPI2-Slave-gpio
From
Contents
- 1 Objective
- 2 Main Features
- 3 Credits
- 4 Personal feedback
- 5 Prerequisites
- 6 Tutorial
- 7 Test the leds
- 8 Setup your remote control in OSMC
- 9 Modify KODI keymapping to power on/off your leds
- 10 Change Log
Objective
The raspberry pi lack of 5V digital pin. With this project my goal is to power some leds behind my tv right from my raspberry home theater computer running OSMC (kodi appliance) to make a discreet light in the room
Main Features
- Add 5V Gpio Arduino UNO to power up some leds
- power on and off discreet light with leds from my remote control using OSMC media center (don't work in openelec)
- Write an up to date tutorial
Credits
Mixed Tutorial sources with each little errors (due to old age of some writings)
- http://www.akeric.com/blog/?p=2420
- http://arduinooo.com/11-blog/5-arduino-pilotee-en-python
- http://robot-kingdom.com/ways-link-raspberry-pi-with-arduino-using-gpio-serial-usb-i2c/
writer of this page: jjguazzo@hotmail.com
Personal feedback
It was difficult to reproduce the tutorials found on internet because they all miss updates. After spending time to try to light some leds directly with my raspberry pi, this way with a cheap chinese arduino uno (ATMEGA328P) is the best way for my objective.
The project works well on my pi htpc but i noticed a little delay when i press the key (1 second or something like this)
Prerequisites
- Arduino IDE installed on a windows PC
Tutorial
Step ONE - Install NANPY library on your PC
what is NANPY
"Nanpy is a library that use your Arduino as a slave, controlled by a master device where you run your scripts, such as a PC, a Raspberry Pi etc." From the Nanpy homepage
Install on your PC with arduino IDE
- go to https://github.com/nanpy/nanpy-firmware
- click the button "Download ZIP" and save the file
- Launch Arduino IDE (integrated development environnment)
- Go to menu "Sketch", Select "Include Library", Select in the sub menu "Add .ZIP Library"
- browse and select the downloaded file in previous steps (filename like "nanpy-firmware-master.zip")
Setup the configuration before uploading the "slave" NANPY arduino code to your arduino uno board
- Open code (.ino file) located in the nanpy library. Filename: nanpy.ino (the path in my case it's C:\Users\myusername\Documents\Arduino\libraries\nanpy-firmware-master\
- Browse to the folder where you selected nanpy.ino and create/edit the file named cfg.h
- in my case this file was missing and i spend some precious time to workaround this little problem :-)
- This file contains the settings for the nanpy code
- These settings define the features supported by your arduino uno in slave mode
- Here is the content of mine
#pragma once

#define BAUDRATE 115200

// info about existence of other features
#define USE_Info                                    1

// definitions: MCU type, frequency, Arduino version,
// EEPROM size, RAM size, pin count, build time,..
#define USE_Define                                  1

// low level mapping of pins and ports
#define USE_ArduinoCore                             1

// read, write RAM
#define USE_RAM                                     1

// read, write EEPROM
#define USE_EEPROM                                  1

// read, write AVR registers
#define USE_Register                                0

// watchdog and reset
#define USE_Watchdog                                0

#define USE_Tone                                    0

#define USE_LiquidCrystal                           0

// I2C
#define USE_Wire                                    0

#define USE_Servo                                   0

#define USE_Stepper                                 0

// frequency counter,  USE_Tone should be off!
#define USE_Counter                                 0

///////////////////////////////////////////////////////////////////////
// external libraries should be installed for the following features:
///////////////////////////////////////////////////////////////////////

// https://github.com/PaulStoffregen/OneWire
#define USE_OneWire                                 0

// https://github.com/milesburton/Arduino-Temperature-Control-Library
#define USE_DallasTemperature                       0


#define USE_CapacitiveSensor                        0

// https://github.com/adafruit/DHT-sensor-library
#define USE_DHT                                     0

// https://bitbucket.org/fmalpartida/new-liquidcrystal
#define USE_LiquidCrystal_I2C                       0

// https://www.adafruit.com/products/1429
#define USE_TLC5947                                 0
Upload the Nanpy.ino code to your arduino uno
- in Arduino IDE go to "Sketch" then select "Verify/Compile"
- if the result of the compilation is correct go again to "Sketch" and select "Upload"
- If the upload is succesfull disconnect the arduino uno (ATMEGA328P) from your pc and go on the pi
In case of trouble, here is a copy of the code of nanpy.ino (version 0.9.6)
#include "cfg_all.h"


#if USE_EEPROM
#include <EEPROM.h>
#endif

#if USE_Servo
#include <Servo.h>
#endif

#if USE_LiquidCrystal
#include <LiquidCrystal.h>
#endif

#if USE_LiquidCrystal_I2C
#include <LiquidCrystal_I2C.h>
#endif

#if USE_Stepper
#include <Stepper.h>
#endif

#if USE_OneWire
#include <OneWire.h>
#endif

#if USE_DallasTemperature
#include <DallasTemperature.h>
#endif

#if USE_CapacitiveSensor
#include <CapacitiveSensor.h>
#endif

#if USE_DHT
#include <DHT.h>
#endif

#if USE_Wire
#include <Wire.h>
#endif

#if USE_TLC5947
#include <Adafruit_TLC5947.h>
#endif

#include "BaseClass.h"
#include "ArduinoClass.h"
#include "OneWireClass.h"
#include "StepperClass.h"
#include "ServoClass.h"
#include "DallasTemperatureClass.h"
#include "LiquidCrystalClass.h"
#include "LiquidCrystalClass_I2C.h"
#include "CapacitiveSensorClass.h"
#include "ToneClass.h"
#include "MethodDescriptor.h"
#include "ComChannel.h"
#include "EEPROMClass.h"
#include "RAMClass.h"
#include "DHTClass.h"

#include "DefineClass.h"
#include "ArduinoCoreClass.h"
#include "WatchdogClass.h"
#include "RegisterClass.h"
#include "CounterClass.h"
#include "InfoClass.h"
#include "WireClass.h"

#include "TLC5947Class.h"

using namespace nanpy;

MethodDescriptor *m = NULL;

void setup() {
    disable_watchdog_at_startup();

    REGISTER_CLASS(ArduinoClass);                                                   // 0.8 k

    REGISTER_CLASS_CONDITIONAL(nanpy::EEPROMClass, USE_EEPROM);                     // 0.3 k
    REGISTER_CLASS_CONDITIONAL(nanpy::RAMClass, USE_RAM);                           //
    REGISTER_CLASS_CONDITIONAL(LiquidCrystalClass, USE_LiquidCrystal);              //  2.3 k
    REGISTER_CLASS_CONDITIONAL(LiquidCrystalClass_I2C, USE_LiquidCrystal_I2C);
    REGISTER_CLASS_CONDITIONAL(OneWireClass, USE_OneWire);                          // 1.7 k
    REGISTER_CLASS_CONDITIONAL(DallasTemperatureClass, USE_DallasTemperature);      // 6.1 k
    REGISTER_CLASS_CONDITIONAL(StepperClass, USE_Stepper);                          // 0.8 k
    REGISTER_CLASS_CONDITIONAL(ServoClass, USE_Servo);                              // 2.5 k
    REGISTER_CLASS_CONDITIONAL(ToneClass, USE_Tone);                                // 2.2 k
    REGISTER_CLASS_CONDITIONAL(CapacitiveSensorClass, USE_CapacitiveSensor);        // 2.2 k
    REGISTER_CLASS_CONDITIONAL(DefineClass, USE_Define);                            // 0.6 k
    REGISTER_CLASS_CONDITIONAL(ArduinoCoreClass, USE_ArduinoCore);                  //
    REGISTER_CLASS_CONDITIONAL(WatchdogClass, USE_Watchdog);                        // 0.2 k
    REGISTER_CLASS_CONDITIONAL(RegisterClass, USE_Register);                        // 1.5 k

    REGISTER_CLASS_CONDITIONAL(CounterClass, USE_Counter);                          //
    REGISTER_CLASS_CONDITIONAL(InfoClass, USE_Info);                          //
    REGISTER_CLASS_CONDITIONAL(DHTClass, USE_DHT);
    REGISTER_CLASS_CONDITIONAL(WireClass, USE_Wire);

    REGISTER_CLASS_CONDITIONAL(TLC5947Class, USE_TLC5947);

    ComChannel::connect();
}

void loop() {
    if(ComChannel::available()) {
        m = new MethodDescriptor();
        Register::elaborate(m);
    }
}
Step Two - Build a small circuit on your breadboard
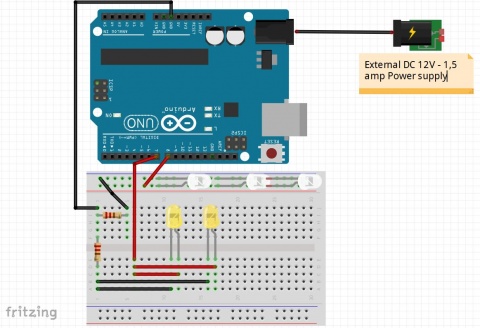
here is my fritzing picture
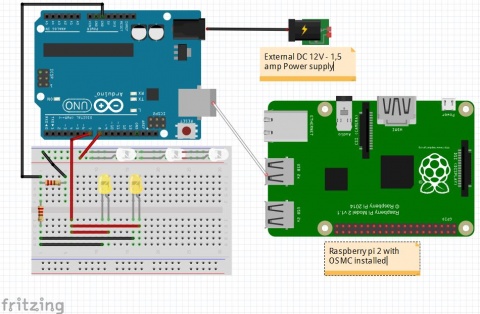
Step Three - connect arduino to your raspberry pi
- Connect to your raspberry pi with you favorite way (putty, direct kvm, tv ...)
- install the python nanpy library with the following command:
- sudo pip install nanpy
- (*) in my case installing nanpy installed also pyserial which is mention on other tutorial as a separate step
- power up your arduino with the specific power port and a dedicated power supply (mine is providing 12V - 1,5A)
- connect your arduino to one usb port on the raspberry pi
illustration:
Test the leds
I take the script from another source and modify it for this specific project
The first script "arduinon.py" is powering leds on
#!/usr/bin/env python

# Original Author: Andrea Stagi <stagi.andrea@gmail.com>
# Modified version Author: Jean-Jacques Guazzo <jjguazzo@hotmail.com>
# Original Description: keeps your led blinking
# Modified Description: put external leds and the internal led on pin 13 on
# Dependencies: None

from nanpy import (ArduinoApi, SerialManager)
from time import sleep

connection = SerialManager()
a = ArduinoApi(connection=connection)

a.pinMode(8, a.OUTPUT)
a.pinMode(7, a.OUTPUT)
a.pinMode(13, a.OUTPUT)
a.digitalWrite(8,1)
a.digitalWrite(7,1)
a.digitalWrite(13,0)
The second script "arduioff.py" is powering the led off
#!/usr/bin/env python

# Author: Andrea Stagi <stagi.andrea@gmail.com>
# Modified version Author: Jean-Jacques Guazzo <jjguazzo@hotmail.com>
# Original Description: keeps your led blinking
# Modified Description: put external leds and the internal led on pin 13 off
# Dependencies: None

from nanpy import (ArduinoApi, SerialManager)
from time import sleep

connection = SerialManager()
a = ArduinoApi(connection=connection)

a.pinMode(8, a.OUTPUT)
a.pinMode(7, a.OUTPUT)
a.pinMode(13, a.OUTPUT)
a.digitalWrite(8,0)
a.digitalWrite(7,0)
a.digitalWrite(13,0)
Setup your remote control in OSMC
Take any remote control using USB or setup your own ir receiver by following this tutorial: Instructables tutorial
Modify KODI keymapping to power on/off your leds
Security tips under osmc: First of all create a scripts directory under home/osmc when logged in with putty, type:
- execute: mkdir scripts
- copy all your scripts inside the scripts folder
- execute: sudo chown osmc scripts
- execute: cd scripts
- execute: sudo chmod u+x *.*
- execute: ls -l and check that your scripts have x right (or a are in green)
intall keymap editor add-on into kodi on your pi.
tutorial here
Launch keymap editor and assign a random function to a specific button on your remote control (by example, any number)
save the modified keymap through the add-on
The connect to your pi using putty (ssh)
after entering root and the password type: "cd .kodi/userdata/keymaps/"
check if the file gen.xml exist.
If yes, edit it with "sudo nano gen.xml"
locate the function that you assigned previously to the button of your remote control.
For this project i assigned the contextual menu to the button 1 on my remote control and my function into gen.xml is :
<key id="61478">contextmenu</key>
To run the python script, replace like this:
<key id="61478">RunScript(/home/osmc/scripts/arduion.py)</key>
exit nano and save your changes.
restart your pi and try if everything works by pushing your assigned button (the leds must power on).
If it's ok, repeat the above steps with another button on your remote and modify gen.xml for this new button to run "arduioff.py"
Don't forget to power off the lights before shutting down your pi because the arduino is autonomous and may keep leds on ;-)
Change Log
- 20160429: i get problems with security under osmc from kodi, i add the tip behind to make the correct security settings to run python scripts right from kodi ;-) - next step .. post a video :-)
- 20160428: I'm currently working to find a way to power off the leds automatically when the pi shutdown


