Difference between revisions of "Mini A5 Laser"
From
(→GBRL) |
|||
| Line 6: | Line 6: | ||
}} | }} | ||
| − | On this page you find the problems (and solutions) of building a cheap chinese mini laser. See this as hints that you can use for improving your own mini laser, but there are no guarantee | + | On this page you find the problems (and solutions) of building a cheap chinese A5 17x20 2000mW mini laser. See this as hints that you can use for improving your own mini laser, but there are no guarantee, so use on your own risk!! |
You working with lasers that might damage your eyes when used improperly. Be aware of your own (and other bystanders) safety. | You working with lasers that might damage your eyes when used improperly. Be aware of your own (and other bystanders) safety. | ||
| − | This is a cheap clone of Eleksmaker A5 you can buy on [http://s.click.aliexpress.com/e/bxfUrdHQ aliexpress] | + | This is a cheap chinese clone of Eleksmaker A5 you can buy on [http://s.click.aliexpress.com/e/bxfUrdHQ aliexpress] |
| + | |||
| + | Specifications : | ||
| + | * Engraving ares 17x20cm | ||
| + | * 2000MW / 2W blue laser | ||
| + | * Delivered with Arduino nano with GRBL 0.8 (and baudrate only 9600!) | ||
=Building= | =Building= | ||
| − | They included a video where they show how to build the machine. Some details are not clearly | + | They included a video where they show how to build the machine. Some details are not clearly sown so here some extra notes : |
| − | * before you screw on the acry | + | * before you screw on the acry legs be sure you have the nuts installed for adjusting the belts. |
| − | + | ||
=GBRL= | =GBRL= | ||
Default version 0.8 was installed, this is a old version and has no laser support. I [https://github.com/gnea/grbl/wiki/Flashing-Grbl-to-an-Arduino updated] to GRBL 1.1f but an extra challenge is that pin D11 and D12 are swapped (so you can use hardware PWM) | Default version 0.8 was installed, this is a old version and has no laser support. I [https://github.com/gnea/grbl/wiki/Flashing-Grbl-to-an-Arduino updated] to GRBL 1.1f but an extra challenge is that pin D11 and D12 are swapped (so you can use hardware PWM) | ||
| + | |||
| + | ==Three ways to update the PWM (swap D11&D12 pin) on Arduino nano GRBL 1.1== | ||
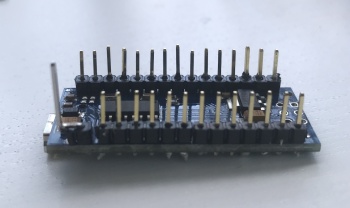
[[File:Arduino nano GRBL.JPG|350px]] | [[File:Arduino nano GRBL.JPG|350px]] | ||
| − | I solved this by hardware, I don't user pin D12 any way (=Z home limit) and rerouted pin D11 to position of D12. | + | I solved this by hardware, I don't user pin D12 any way (=Z home limit) and rerouted pin D11 to position of D12. I cut off the pin D11 and bend the leg of D12 to the position of D11. I used a extra long header pin, but I don't think it's really necessary. |
You could also fix this in software by disable the option '#define VARIABLE_SPINDLE' in config.h, but then you have only laser on/off control, wich is very limited. | You could also fix this in software by disable the option '#define VARIABLE_SPINDLE' in config.h, but then you have only laser on/off control, wich is very limited. | ||
| Line 28: | Line 35: | ||
Other way to fix this is by modify the pcb "You can cut the track connected to D12 on your board and connect it to D11 to install grbl v1.1." | Other way to fix this is by modify the pcb "You can cut the track connected to D12 on your board and connect it to D11 to install grbl v1.1." | ||
| − | Change the default GRBL 1.1f to: | + | Change the default GRBL 1.1f settings to: |
* $32=1 (laser mode enable) | * $32=1 (laser mode enable) | ||
* $100 = 80 (steps per mm/ X) | * $100 = 80 (steps per mm/ X) | ||
Revision as of 22:45, 22 April 2019
| Project: Mini A5 Laser | |
|---|---|

| |
| Name | Mini A5 Laser |
| Initiator | zeno4ever |
| Status | {{{Status}}} |
| Skills | Arduino, CNC |
| Summary | Make a chinese A5 Laser more useable |
On this page you find the problems (and solutions) of building a cheap chinese A5 17x20 2000mW mini laser. See this as hints that you can use for improving your own mini laser, but there are no guarantee, so use on your own risk!!
You working with lasers that might damage your eyes when used improperly. Be aware of your own (and other bystanders) safety.
This is a cheap chinese clone of Eleksmaker A5 you can buy on aliexpress
Specifications :
- Engraving ares 17x20cm
- 2000MW / 2W blue laser
- Delivered with Arduino nano with GRBL 0.8 (and baudrate only 9600!)
Contents
Building
They included a video where they show how to build the machine. Some details are not clearly sown so here some extra notes :
- before you screw on the acry legs be sure you have the nuts installed for adjusting the belts.
GBRL
Default version 0.8 was installed, this is a old version and has no laser support. I updated to GRBL 1.1f but an extra challenge is that pin D11 and D12 are swapped (so you can use hardware PWM)
Three ways to update the PWM (swap D11&D12 pin) on Arduino nano GRBL 1.1
I solved this by hardware, I don't user pin D12 any way (=Z home limit) and rerouted pin D11 to position of D12. I cut off the pin D11 and bend the leg of D12 to the position of D11. I used a extra long header pin, but I don't think it's really necessary.
You could also fix this in software by disable the option '#define VARIABLE_SPINDLE' in config.h, but then you have only laser on/off control, wich is very limited.
Other way to fix this is by modify the pcb "You can cut the track connected to D12 on your board and connect it to D11 to install grbl v1.1."
Change the default GRBL 1.1f settings to:
- $32=1 (laser mode enable)
- $100 = 80 (steps per mm/ X)
- $101 = 80 (steps per mm/ Y)
- $110 = 1000 (max. rate mm/min in X)
- $111 = 1000 (max. rate mm/min in Y)
- $120 = 100 (acceleration mm/s^2 in X)
- $121 = 100 (acceleration mm/s^2 in Y)
