IoT - Bouw je eigen TTN node
From
| Event Bouw je eigen TTN node | |
|---|---|
| Name | Bouw je eigen TTN node
|
| Duration | 2016/05/21 - 2016/05/21 |
| Information | Build your own TTN node
|
Contents
- 1 TTN Node
- 2 Instructions
- 2.1 Test Arduino Nano - Program blink, change frequency, blink.
- 2.2 Solder RN2483 - Press down with finger at correct location. Tin on corners.
- 2.3 Break header strip into two peices of 15 pins.
- 2.4 Press Arduino Nano down on soldered header strips.
- 2.5 TTNCTL
- 2.6 Arduino code - https://github.com/jpmeijers/ttnmapperarduino
- 2.7 Optional
TTN Node
Build your own TTN Node / IoT Sensor in one afternoon. Some soldering and programming required.
This TTN Node exist of the folowing components (Cost € 25,=) :
If you join this workshop you get all of the above parts to make the Node. You are also welcome if you have your own parts and want a own TTN design, we can then exchange experience and tips.
Join this workshop here.
Instructions
Test Arduino Nano - Program blink, change frequency, blink.
- Software serial on pins 10, 11. Add wire for loopback.
Solder RN2483 - Press down with finger at correct location. Tin on corners.
- Solder rest of pins: 6, 7, 32, 33, 34 - the others are not neccesary
- http://forum.thethingsnetwork.org/t/how-to-build-your-first-ttn-node-arduino-rn2483/1574
Break header strip into two peices of 15 pins.
- Use spreader to hold right angle header strips in place.
- Solder first and last pin of header strips.*
- Remove spacer, solder rest of header pins.
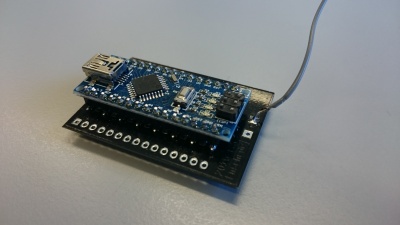
Press Arduino Nano down on soldered header strips.
- If everything looks correct, solder the Arduino to the header pins.
TTNCTL
- Download and follow the steps at https://staging.thethingsnetwork.org/wiki/Backend/ttnctl/QuickStart
- When registering a device, following the procedure for registering a personalized device (ABP).
- Add the parameter --relax-fcnt
- Choose a random device address: https://www.random.org/bytes/ - 4 bytes, capital letters.
- Now ttnctl subscribe --plain to wait for packets.
Arduino code - https://github.com/jpmeijers/ttnmapperarduino
- Download the zip file and place the library and example files in your Arduino folder.
- Open TXfastViaTTN.ino
- Change line 74 to your own AppEUI, NwkSKey, AppSKey and DevAddr
- Program the code to the Arduino.
- If everything is correct you should see packets arriving in ttnctl.
Optional
- Install the TTNmapper Android app and help us map the coverage of the network.
- Read the internal temperature sensor of the Arduino and transmit the value over TTN.
- Add an external prototyping board, add sensors, transmit the values.
